Simplicité on Docker
Simplicité instances can easily be deployed on the Docker engine.
This document gives you extended information on how to use/configure such Docker-based deployments, including in advanced cases.
A simplified tutorial is also available for a step by step procedure in the usual case.
Prerequisites
Have a Linux server with Docker-ce installed and configured (e.g. with recent Linux distributions this is straightforward as Docker is part of the distributions) or an account at a cloud provider allowing Docker images deployments.
Take a look at the Docker documentation for details.
Run a Simplicité platform container
Introduction
To run a Simplicité platform container you can either use one of our pre-built images as is or build a custom image that fits your custom needs.
Use the pre-built platform images
Pre-built platform images including the latest Simplicité intances are available and can be run as is.
This is the best/normal approach if you don't have specific needs.
These images are available either as server-only images and server + platform images on our private Docker registry (use docker login https://registry.simplicite.io to sign in)
Please contact us to get access to these images.
Build a custom image
If, for some good reasons, you can't use one of the above pre-built images as is you can build your own custom image:
- Pull the Simplicité Docker platform image from the appropriate registry:
docker pull registry.simplicite.io/platform:<tag>and build a new child image customizing what you need to customize (e.g. add SSL certificates, etc.)
or (not recommended except for very specific requirements and reserved to Simplicité experts only):
- Get the Simplicité instance template from our private Git repository, please contact us to get access to this Git repository.
- Pull the Simplicité Docker server image from the appropriate registry:
docker pull registry.simplicite.io/server:<tag>and build a new child image adding the application package of the instance template (in theappfolder of the instance template).
Note: if your server has no access to internet you can still get the image manually by saving it on a server which has access (
docker save registry.simplicite.io/<server|platform:<tag>> > simplicite-<server|platform>[-<tag>].tar), then transfer it to yor target server, then load it on this server's local docker images registry (docker load < simplicite-<server|platform>[-<tag>].tar)
Basic procedure on CentOS 7
On an "out of the box" CentOS 7 server you can start a clean & fresh Simplicité sandbox instance with the folowing commands in only few seconds:
First, install the standard Docker service:
sudo yum -y update
sudo yum -y install docker
sudo systemctl enable docker
sudo systemctl start docker
Note: by default Docker is allowed to change the firewall rules to open exposed ports. To disable this behavior you need to edit
/usr/lib/systemd/system/docker.servicecartridge file and add--iptables=falseto theExecStartcommand.
Then pull the platform image and run an ephemeral container from this image:
sudo docker login
sudo docker pull registry.simplicite.io/platform
sudo docker run -it --rm -name <myapp> -p 80:8080 registry.simplicite.io/platform:<tag>
Note: to make the docker container running permanently (and restarting at reboot) use
-d --restart=alwaysinstead of-it --rm
The instance is then available on http://<your server IP address or hostname>
Basic procedure on Debian 9
On an "out of the box" Debian 9 server you can start a clean & fresh Simplicité® sandbox instance with the folowing commands in only few seconds:
Install the up-to-date Docker-CE service:
sudo apt-get update
sudo apt-get -y remove docker docker-engine docker.io
sudo apt-get install -y apt-transport-https ca-certificates wget software-properties-common
wget https://download.docker.com/linux/debian/gpg
sudo apt-key add gpg
echo "deb [arch=amd64] https://download.docker.com/linux/debian $(lsb_release -cs) stable" | sudo tee -a /etc/apt/sources.list.d/docker.list
sudo apt-get update
sudo apt-get -y install docker-ce
sudo systemctl start docker
sudo systemctl enable docker
Pull the platform image and run an ephemeral container:
sudo docker login
sudo docker pull registry.simplicite.io/platform:<tag>
sudo docker run -it --rm -name <myapp> -p 80:8080 registry.simplicite.io/platform:<tag>
Note: to make the docker container running permanently (and restarting at reboot) use
-d --restart=alwaysinstead of-it --rm
The instance is then available on http://<your server IP address or hostname>
Procedure on managed cloud platforms
Please refer to your cloud provider's documentation to learn how to deploy containers on their specific infrastructures.
Tags
There are several variants of the prebuilt images: registry.simplicite.io/platform:<tag>
Exposed ports
The prebuilt images are configured to exposes the following ports for different usage:
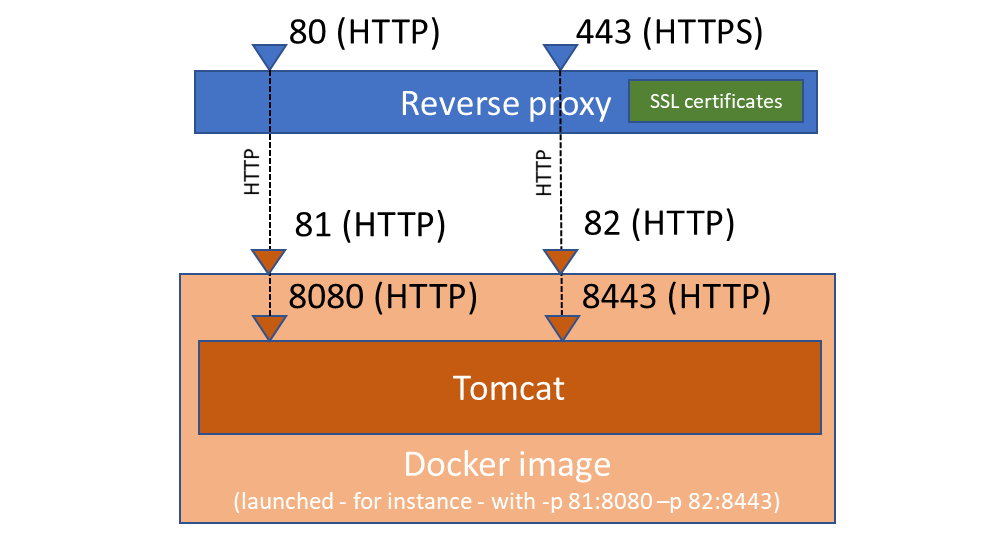
- Tomcat HTTP port
8080for direct access or to be exposed directly as an HTTP endpoint or thru an HTTP reverse proxy endpoint (Apache, NGINX, ...) - Tomcat secure HTTP port
8443to be exposed thru an HTTPS reverse proxy endpoint (Apache, NGINX, ...) - Tomcat SSL port
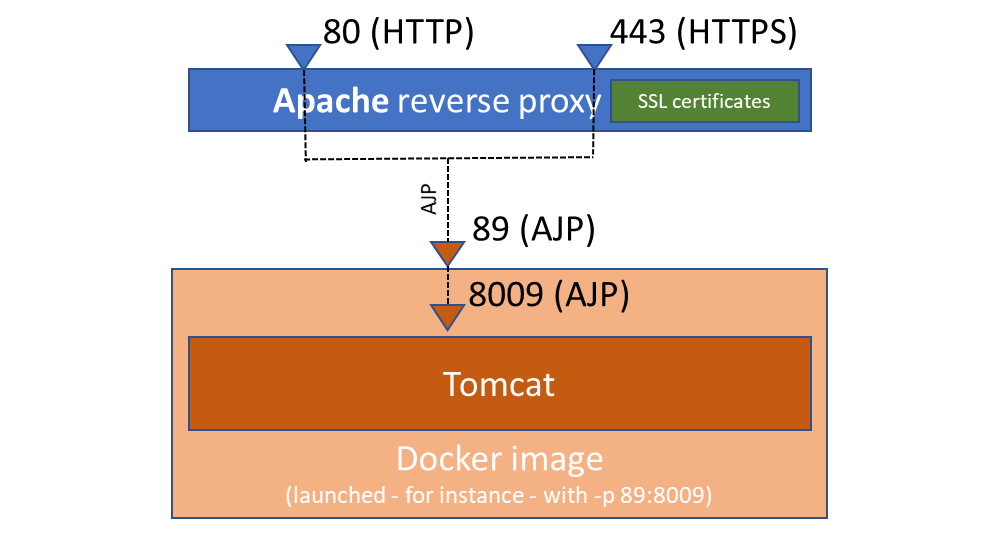
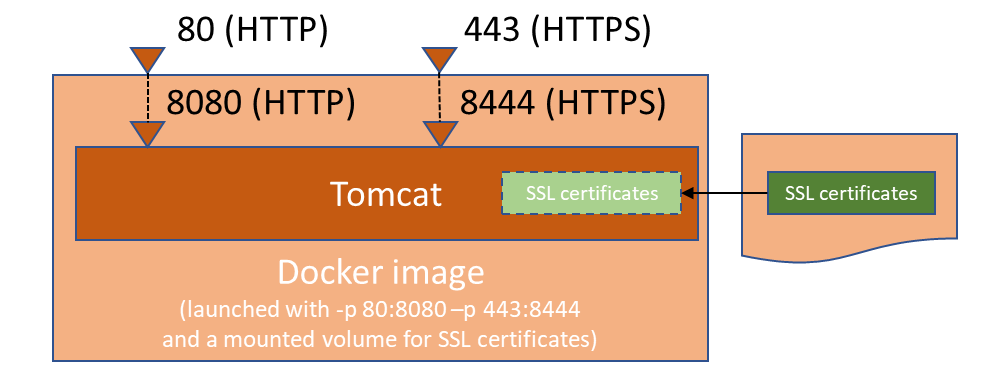
8444to be exposed directly as an HTTPS endpoint, Note that this requires an addtional-eflag and to mount (or replace) the appropriate JKS certificate (see below) - Tomcat AJP port
8009to be exposed thru an HTTP/HTTPS reverse proxy (Apache), this requires an additionalc-eflag (see below) - Tomcat admin port
8005for starting/stopping Tomcat from outside of the container (not supposed to be used) - Tomcat JPDA port
8000for remote debugging Tomcat (Tomcat is started with thejpdakeyword), this requires an additional-eflag (see below) - Tomcat JMX port
1099for connecting a JMX monitoring tool on Tomcat (Tomcat is started with additional JVM options) and1098for RMI communication, this requires an additional-eflag (see below)
Warning: If you expose the HTTP port
8080thru an HTTPS reverse proxy endpoint or if you expose the secure HTTPS port thru an HTTP reverse proxy endpoint it will result in unexpected and unwanted behaviors.
The typical configuration using the above ports are the following:
With an HTTP reverse proxy:
With an AJP reverse proxy (Apache):
Without a reverse proxy:
Run variants
Run with an embedded HSQLDB database
sudo docker run\
	[-it --rm | -d [--restart=always]]\
	-name <myapp>\
	-p <public port, e.g. 8080>:8080\
	[-p <secured HTTP port, e.g. 8443>:8443]\
	registry.simplicite.io/platform:<tag>
The database files and the documents are stored on the file system within the container, if you do nothing in particular this embedded data is thus ephemeral (it won't survive if you replace the container when upgrading the platform for instance) this is not what you want in most cases.
If you want the embedded data to persist you must map the folders containing the database files and the documents as named volumes.
You first need to create these named volumes (prior to first start of the container), this has to be done only once:
sudo docker volume create <myapp>_db
sudo docker volume create <myapp>_dbdoc
Then you need to run your container with the appropriate -v volumes mappings, e.g:
sudo docker run\
	(...)\
	-v <myapp>_db:/usr/local/tomcat/webapps/ROOT/WEB-INF/db\
	-v <myapp>_dbdoc:/usr/local/tomcat/webapps/ROOT/WEB-INF/dbdoc\
	registry.simplicite.io/platform[:tag]
Note: you can also use this volume strategy with
dbdoconly along with an external database not configured to store documents as BLOBs. This approach is only suitable for very particular needs (e.g. if you want to have a file system access to your documents, etc.)
Run with an external database
Both the server and prebuilt images allows you to start a container using an external database using the following DB_* environment variables:
sudo docker run\
	(...)\
	-e DB_SETUP=<setup MySQL/MariaDB, PostgreSQL Oracle or SQLServer database if empty = true|false>\
	-e DB_VENDOR=<database vendor = mysql|postgresql|oracle|mssql>\
	-e DB_HOST=<hostname or IP address>\
	-e DB_PORT=<port, defaults to 3306 for mysql, 5432 for postgresql, 1521 for oracle or 1433 for mssql>\
	-e DB_USER=<database username>\
	-e DB_PASSWORD=<database username's password>\
	-e DB_NAME=<database name>\
	[-e DB_SSL=<true|false, defaults to false, only applicable to mysql and postgresql>]\
	[-e DB_MYISAM=<true|false>, use MyISAM engine for mysql, defaults to false, only taken into account during database setup>]\
	[-e DB_DOC=<BLOB|dbdoc|<custom path>, defaults to BLOB, only taken into account during database setup>]
	registry.simplicite.io/platform[:tag]
Note: If you plan to use a database server running on the host machine you need to get the appropriate IP address to pass as
DB_HOSTenvironment variable (using127.0.0.1will not work unless you use--net=hostwhich only makes sense in particular cases).To get this adress run the following command:
ip -4 addr show docker0 | grep -Po 'inet \K[\d.]+'The result is usually
172.17.0.1but it may vary.Also make sure your database is configured to allow connections on this IP and its port and that the firewall considers the
docker0interface as trusted, this can be ensured by:sudo firewall-cmd --permanent --zone=trusted --add-interface=docker0
sudo firewall-cmd --reload
The DOC_DIR system parameter should be set by default to BLOB for external databases (this means documents are stored in the database as BLOBs).
Otherwise you must mapped the folder containing the documents denoted by DOC_DIR as a named volume.
See below, this is not recommended unless you have to handle huge volumes of documents.
Enable SSL Tomcat connector
It is possible to enable a SSL conector at Tomcat level (e.g. useful if you don't use a reverse proxy):
- Enable/disable the SSL connector:
-e SSL=<true|false, defaults to false> - Expose the SSL port:
-p <SSL port, e.g. 8444>:8444> - Optionaly mount a custom JKS :
-v <host folder in which is myserver.jks>:/usr/local/tomcat/cert- Indicate the mounted JKS path:
-e KEYSTORE_FILE=/usr/local/tomcat/cert/myserver.jks - Provide JKS password
-e KEYSTORE_PASSWORD=<my keystore password, defaults to "password">
- Indicate the mounted JKS path:
Enable Tomcat AJP connector
It is possible to enable/disable an AJP conector at Tomcat level (e.g. useful if you use an Apache reverse proxy):
- Enable/disable the AJP connector:
-e AJP=<true|false, defaults to false> - Expose the AJP port:
-p [127.0.0.1:]<AJP port, e.g. 8009>:8009]
Start Tomcat in remote debug (JPDA) mode
It is possible to start Tomcat in remote debug (JPDA) mode (e.g. useful in development):
- Enable/disable JPDA mode:
-e JPDA=<true|false, defaults to false> - Expose the JPDA port:
-p [127.0.0.1:]<JPDA port, e.g. 8000>:8000 - Optionally suspend startup till a JPDA debugger connects:
-e JPDA_SUSPEND=<y|n, defaults to n>
Note: starting Tomcat in this mode has a huge impact on performances, never do it in production.
Enable JMX services
You can enable JMX services:
- Enable/disable JMX services:
-e JMX=<true|false, defaults to false> - Expose the JMX port:
-p [127.0.0.1:]<JMX port, e.g. 1099>:1099]
Enable GZIP compression
You can enable/disable GZIP compression at Tomcat level: -e GZIP=<true|false, defaults to false>
Enable/disable endpoints or define IP address(es) whitelists
Enable/disable or define an IP address(es) white list on the ping endpoint
You can you can add an IP address(es) white list at Tomcat level for the ping endpoint (/ping), this endpoint is always enabled:
- Define a white list:
-e PING_WHITELIST="<comma-separated list of IP address / IP ranges regex patterns, e.g. 127.0.0.1, ::1, 172.17.0.0/24>"
Enable/disable or define an IP address(es) white list on the health check endpoint
You can enable or disable the health check endpoint (/health) and you can add an IP address(es) white list at Tomcat level for this endpoint:
- Enable/disable:
-e SYSPARAM_USE_HEALTH=<true|false, defaults to the configured value of the system parameter> - Define a white list:
-e HEALTH_WHITELIST="<comma-separated list of IP address / IP ranges regex patterns, e.g. 127.0.0.1, ::1, 172.17.0.0/24>"
Enable/disable or define an IP address(es) white list on the I/O enpoint
You can enable or disable the I/O endpoint (/io) and you can define an IP address(es) white list at Tomcat level for this endpoint:
- Enable/disable:
-e SYSPARAM_USE_IO=<true|false, defaults to the configured value of the system parameter> - Define a white list:
-e IO_WHITELIST="<comma-separated list of IP address / IP ranges regex patterns, e.g. 127.0.0.1, ::1, 172.17.0.0/24>"
Note: When deploying several Simplicité nodes, make sure to configure a proper filtering rule and an I/O password to allow. these nodes to communicate with each other (e.g. for propagating a clear cache). This can be acheived by adding the dedicated environment variable
-e IO_PASSWORD=<a very complex password, can be plain text (not recommended) or hashed using configured algorithm (without salting)>
Enable/disable or define an IP address(es) white list on the Git enpoint
You can enable or disable the Git endpoint (/git) and you can define an IP address(es) white list at Tomcat level for this endpoint:
- Enable/disable:
-e SYSPARAM_USE_GIT=<yes|no, defaults to the configured value of the system parameter> - Define a white list:
-e GIT_WHITELIST="<comma-separated list of IP address / IP ranges regex patterns, e.g. 127.0.0.1, ::1, 172.17.0.0/24>"
Enable/disable or define an IP address(es) white list on the Maven repository enpoint
You can enable or disable the Maven repository endpoint (/maven) and you can define an IP address(es) white list at Tomcat level for this endpoint:
- Enable/disable:
-e SYSPARAM_USE_MAVEN=<yes|no, defaults to the configured value of the system parameter> - Define a white list:
-e MAVEN_WHITELIST="<comma-separated list of IP address / IP ranges regex patterns, e.g. 127.0.0.1, ::1, 172.17.0.0/24>"
Enable/disable or define an IP address(es) white list on the API enpoint
You can enable or disable the API endpoint (/api) and you can define an IP address(es) white list at Tomcat level for this endpoint:
- Enable/disable:
-e SYSPARAM_USER_API=<yes|no, defaults to the configured value of the system parameter> - Define a white list:
-e API_WHITELIST="<comma-separated list of IP address / IP ranges regex patterns, e.g. 127.0.0.1, ::1, 172.17.0.0/24>"
Enable/disable or define an IP address(es) white list on the UI enpoint
You can enable or disable the UI endpoint (/ui) and you can define an IP address(es) white list at Tomcat level for this endpoint:
- Enable/disable:
-e SYSPARAM_USER_UI=<yes|no, defaults to yes> - Define a white list:
-e UI_WHITELIST="<comma-separated list of IP address / IP ranges regex patterns, e.g. 127.0.0.1, ::1, 172.17.0.0/24>"
Enable CORS
You can have CORS enforced at Tomcat level:
- Enable/disable CORS:
-e CORS=<true|false, defaults to false> - Set CORS origins:
-e CORS_ORIGINS=<origin URLs, defaults to *> - Enable/disable CORS "with credentials":
-e CORS_CREDENTIALS=<true|false, defaults to true>
Warning: if you set "with credentials" to
trueyou must set explicit origins, any origin (*) is not permitted by CORS specifications in this case.
Disable websockets
On some networks you can't use websockets, they can be enabled/disabled using -e WEBSOCKETS=<true|false, defaults to true>]
Disable Java compiler
In some cases (e.g. for security reasons) it may be required to explicitly disable the Java compiler, to do so it is possible to use -e COMPILER=<true|false, defaults to true>]
Note that this means that any Java compiled class must be provided otherwise, e.g. by mounting/copying externally built JARs in the WEB-INF/lib of the webapp.
Force overridden values of system parameters at startup
It is possible to set the overridden value of system parameters at startup by using -e SYSPARAM_<system param name>=<overridden system param value> environment variables.
Developper mode
If you plan to act as a developper on the container (e.g. use developpment-oriented features such as code formatting, etc.)
you must add the DEV_MODE environment variable: -e DEV_MODE=true
In particular, this environment variable enables access to the JDK sun.com.tools packages (compiler, ...).
This only makes sense if you are using a JDK and not a JRE for which these package are not preset anyway.
Force the server URL
It is possible to force a custom server URL (e.g. when exposed through a reverse proxy that does not send public URL information to Tomcat)
by using -e SERVER_URL=<a custom public URL>
Warning: this will prevent exposing the instance on several public URLs. This is to be considered as a workaround for poorly configurable/configured reverse proxies.
Run with volumes for server and platform logs
The logs folders of both the server and the platform are stored on the file system within the container, if you do nothing in particular these folders are thus ephemeral (they won't survive if you replace the container when upgrading the platform for instance).
If you want the log folders to persist you must map the 2 log folders as a named volumes.
You first need to create these named volumes (prior to first start of the container), this has to be done only once:
sudo docker volume create <myapp>_server_logs
sudo docker volume create <myapp>_platform_logs
Then you need to run your container with the appropriate -v volumes mapping, e.g:
sudo docker run (...) -name <myapp>\
	-v <myapp>_server_logs:/usr/local/tomcat/logs\
	-v <myapp>_platform_logs:/usr/local/tomcat/webapps/ROOT/WEB-INF/log\
	registry.simplicite.io/platform[:tag]
Run with a volume for modules' Git repository
The Git repository of the modules are stored on the file system within the container, if you do nothing in particular these Git repository are thus ephemeral (they won't survive if you replace the container when upgrading the platform for instance).
If you want your modules' Git repository to persist you must map the Git base folder as a named volume.
You first need to create this named volume (prior to first start of the container), this has to be done only once:
sudo docker volume create <myapp>_git
Then you need to run your container with the appropriate -v volume mapping, e.g:
sudo docker run (...) -name <myapp>\
	-v <myapp>_git:/usr/local/tomcat/webapps/ROOT/WEB-INF/git\
	registry.simplicite.io/platform[:tag]
Add remote Git credentials
If you use a remote Git repositories managements platform such as GitHub or GitLab you can use remote SSH URIs and provide credentials as SSH keys, see bellow.
If you prefer HTTP(S) remote URIs you can pass a username and password using -e REMOTE_GIT_USERNAME=<username> -e REMOTE_GIT_PASSWORD=<pasword>.
Add an SSH key
It is possible to mount your local .ssh directory (that contains your SSH key, authorized SSH keys, ...) by adding this kind of mount argument:
-v /path/to/your/ssh/dir:/usr/local/tomcat/.ssh
It is also possible to provide a list of IP addresses or hostnames to be added to the known hosts file by passing this environment variable:
-e SSH_KNOWN_HOSTS="github.com gitlab.com"
Note: it may be better to mount the
.sshdir in read only mode by adding:robut in this case theSSH_KNOWN_HOSTSis inefficent as it can't write the.ssh/known_hostsfile. In this case you must reference your known hosts prior to mounting the volume in read only.
Run on a specific time zone
It is possible to specify in which timezone Tomcat will run by using -e TOMCAT_TIMEZONE=<time zone string e.g. Europe/Paris>.
If not specified it will run in the UTC time zone.
You can also use the OS-level TZ environment variable (but make sure to use a value known by the JVM, e.g. Europe/Paris not CEST).
Warning: if you specify a custom timezone in your container and use an external database, make sure the database's timezone matches your custom timezone. For most databases flavors this can be achieved by setting the
TZenvironment variable.
Enable/disable Tomcat logging of JVM arguments, environment variables or properties
It is possible to enable/disable the way Tomcat logs the following elements during its startup process:
- JVM arguments:
-e TOMCAT_LOG_ARGS=<true|false, defaults to false> - Environment variables:
-e TOMCAT_LOG_ENV=<true|false, defaults to false> - Properties:
-e TOMCAT_LOG_PROPS=<true|false, defaults to false>
Logging
Enable/disable console/file log appenders
It is possible to enable/disable the console/file appenders of the standard
application logging using Log4J (i.e. managed by AppLog and configurable log events):
- Console appender:
-e LOG4J_CONSOLE=<true|false, defaults to true> - File appender:
-e LOG4J_FILE=<true|false, defaults to true>
Customize logging levels
It is possible to adjust the logging levels:
- Standard application logging using Log4J (i.e. managed by
AppLogand configurable log events):-e LOG4J_ROOT_LEVEL=<Log4J logging level for console and file: all|trace|debug|info|warn|error|fatal|off, defaults to debug> - Default Java logging (used by some 3rd party libs and during early stage platform startup phase):
-e LOGGING_CONSOLE_LEVEL=<default logging level for console: FINEST|FINER|FINE|CONFIG|INFO|WARNING|SEVERE|OFF, defaults to FINE>-e LOGGING_FILE_LEVEL=<default logging level for file: FINEST|FINER|FINE|CONFIG|INFO|WARNING|SEVERE|OFF, defaults to FINE>
Cleaning work/log dirs
It is possible to enable/disable cleanning the work and/or log dirs at startup:
- Clean work dirs:
-e TOMCAT_CLEAN_WORK_DIRS=<true|false, defaults to true> - Clean log dirs:
-e TOMCAT_CLEAN_LOG_DIRS=<true|false, defaults to false>
Adjust advanced Tomcat settings
It is possible to adjust some advanced Tomcat settings:
- Maximum HTTP header size:
-e TOMCAT_MAXHTTPHEADERSIZE=<max header size in bytes, defaults to 8192> - Maximum POST request body size:
-e TOMCAT_MAXPOSTSIZE=<max POST request body size, defaults to -1 which means no limit> - Maximum threads:
-e TOMCAT_MAXTHREADS=<max number of threads, defaults to 200> - Maximum connections:
-e TOMCAT_MAXCONNECTIONS=<max number of connections, defaults to 8192>
Set custom JVM options
It is also possible to pass other custom options to the JVM by using -e JAVA_OPTS=<java options>
E.g. content of JAVA_OPTS:
-Xms<min memory e.g. 256m> -Xmx<max memory e.g. 1024m>to adjust min/max allocated memory-Dhttp.proxyHost=<HTTP proxy hostname or IP address> -Dhttp.proxyPort=<HTTP proxy port> -Dhttps.proxyHost=<HTTPS proxy hostname or IP address> -Dhttps.proxyPort=<HTTPS proxy port>to set the JVM's default HTTP/HTTPS proxy- Etc.
Run behind a reverse proxy
the exposed HTTP ports 8080/8443 are designed to be used with an HTTP/HTTPS reverse proxy such as NGINX, Traefik, Apache, Lighttpd, ...:
8080must be used for HTTP endpoints8443must be used for HTTPS endpoints
Warning: If you use the
8080port with an HTTPS endpoint or the8443port with an HTTP endpoint it will not work as expected.
The exposed AJP port 8009 is designed to be used with a Apache reverse proxy (for both HTTP and HTTPS endpoints).
So depending on the reverse proxy you plan to use you have to use either
-p [<listen host, e.g. 127.0.0.1>:]<local port e.g. 8080>:8080 -p [<listen host, e.g. 127.0.0.1>:]<local port e.g. 8443>:8443
or -p [<listen host, e.g. 127.0.0.1>:]<local AJP port, e.g. 8009>:8009 in you docker run command.
Example of a reverse proxy configuration using NGINX
In this very basic example all plain HTTP trafic is redirected to HTTPS. The SSL certificates are handled by NGINX
and thus the container's 8443 port (exposed here using -p 8443:8443) is the only one used.
server {
    listen 80;
    server_name myapp.myhost.mydomain;
    location / {
        return 301 https://myapp.myhost.mydomain$request_uri;
    }
}
server {
    listen 443 ssl;
    server_name myapp.myhost.mydomain;
    ssl_certificate /etc/ssl/myhost.mydomain.crt;
    ssl_certificate_key /etc/ssl/myhost.mydomain.key;
    location / {
        proxy_redirect off;
        proxy_buffering off;
        proxy_read_timeout 86400s;
        proxy_send_timeout 86400s;
        proxy_set_header Host $http_host;
        proxy_set_header X-Real-IP $remote_addr;
        proxy_set_header X-Forwarded-For $proxy_add_x_forwarded_for;
        proxy_set_header X-Forwarded-Proto https;
        proxy_pass http://localhost:8443;
        proxy_http_version 1.1;
        proxy_set_header Upgrade $http_upgrade;
        proxy_set_header Connection "upgrade";
    }
}
Example of a reverse proxy configuration using Traefik
In this very basic example all plain HTTP trafic is redirected to HTTPS. The SSL certificates are handled by Traefik
and thus the container's 8443 port (exposed here using -p 8443:8443) is the only one used.
[entryPoints]
  [entryPoints.http]
  address = ":80"
    [entryPoints.http.redirect]
    entryPoint = "https"
  [entryPoints.https]
  address = ":443"
    [entryPoints.https.tls]
      [[entryPoints.https.tls.certificates]]
      certFile = "/etc/ssl/myhost.mydomain.crt"
      keyFile = "/etc/ssl/myhost.mydomain.key"

[backends]
  [backends.myapp]
    [backends.myapp.servers.server1]
       url = "http://127.0.0.1:8443"

[frontends]
  [frontends.myapp_ssl]
     backend = "myapp"
     entrypoints = ["https"]
     passHostHeader = true
     [frontends.myapp.routes.route1]
       rule = "Host:myapp.myhost.mydomain"
Advanced configurations
Add a custom certificate
If you need to add a custom certificate (e.g. a CA certificate or a database certificate) to the image you must build a derived image from
one of our image using a Dockerfile like:
For CentOS based-images:
FROM registry.simplicite.io/platform:[<centos-based tag>]
COPY mycertificate.pem /etc/pki/ca-trust/source/anchors/
RUN /bin/update-ca-trust extract
For Alpine based images:
FROM registry.simplicite.io/platform:[<alpine-based tag>]
COPY mycertificate.pem /usr/local/share/ca-certificates/
RUN update-ca-certificates
Apply system customizations after system initial deployment and subsequent system upgrades
If you need to alter the system configuration after initial deployment and after each subsequent system upgrade you can
mount a custom XML patch file like this -v my-custom-file.xml:/usr/local/tomcat/webapps/ROOT/WEB-INF/patch/V5/customization.xml
or by building a custom image:
FROM registry.simplicite.io/platform:[<alpine-based tag>]
COPY my-custom-file.xml /usr/local/tomcat/webapps/ROOT/WEB-INF/patch/V5/customization.xml
This custom XML patch is applied at the end of the system patching procedure.
Build a custom image with non root webapp context path
The default registry.simplicite.io/platform images deploys the webapp on the root context /, if you want to deploy the webapp on a non root context (e.g. /myapp)
you can build a custom image using the following Dockerfile:
ARG tag=latest
FROM registry.simplicite.io/platform:$tag
ARG ctx=simplicite
RUN mv /usr/local/tomcat/webapps/ROOT /usr/local/tomcat/webapps/$ctx && \
    sed -i "s/\/ROOT\//\/$ctx\//g" /usr/local/tomcat/webapps/$ctx/META-INF/context.xml && \
    sed -i "s/\/ROOT\//\/$ctx\//g" /usr/local/tomcat/webapps/$ctx/WEB-INF/classes/log4j2.xml && \
    sed -i "s/\/ROOT\//\/$ctx\//g" /usr/local/tomcat/webapps/$ctx/WEB-INF/classes/logging.properties && \
    sed -i "s/webapps\/ROOT/webapps\/$ctx/g" /usr/local/tomcat/run.sh
And the following build command:
sudo docker build -t <image tag> --build-arg tag=<the tag of the base image> --build-arg ctx=<a non root context, e.g. myapp> .
Add a local email server (for developement only)
If required in development, you can start a local Postfix SMTP server within the container by using -e LOCAL_SMTP_SERVER=true.
Using this feature requires that you build a custom image including the Postfix Package:
For CentOS-based images:
FROM registry.simplicite.io/platform:<tag>
RUN yum -y install postfix && yum clean all && rm -rf /var/cache/yum
RUN sed -i 's/^inet_protocols = all/inet_protocols = ipv4/' /etc/postfix/main.cf
For Debian-based image:
FROM registry.simplicite.io/platform-4.0.Pxx-alpine
RUN apk add --update postfix && rm -rf /var/cache/apk/*
Note: starting a Postfix process within the container is not suitable for production where an external SMTP service must be used instead.
Add custom Maven dependencies
If you need addtional libraries that are not -yet - integrated in Simplicité you can build a custom images with addtional Maven dependencies
using the embedded adddeps.sh script.
For instance, given the folowing Dockerfile:
FROM registry.simplicite.io/platform:<tag>
USER simplicite
ARG maven=3.9.9
ARG deps
RUN wget -qO- https://www-eu.apache.org/dist/maven/maven-3/$maven/binaries/apache-maven-$maven-bin.tar.gz | tar xfz - && \
    MAVEN_HOME=/usr/local/tomcat/apache-maven-$maven ./adddeps.sh $deps && \
    rm -fr /usr/local/tomcat/apache-maven-$maven
USER root
you can add the dependencies like this:
docker build (...) --build-arg deps="<group ID 1>:<artifact ID 1>:<version 1> (...) <group ID 1>:<artifact ID 1>:<version 1>" .
Note that only the non conflicting JAR librairies denoted by the dependencies will be added to the platform's JAR librairies. You need to check carefully the build logs to see which libraries were ignored.
Run with Docker Compose tool
You can use the Docker Compose tool to start an database container and a Simplicité instace container.
Prerequisites
The only packages you need are Docker and the Docker Compose tool:
sudo yum install docker docker-compose
Then you can enable and start the Docker daeamon and login to DockerHub with an account allowed to pull the private pre-built images registry.simplicite.io/platform:<tag>:
sudo systemctl enable docker
sudo systemctl start docker
sudo docker login
HSQLDB
Create the following docker-compose.yml file:
services:
  web:
    image: registry.simplicite.io/platform:<tag>
    restart: always
    container_name: <myapp>
    ports:
      - 80:8080
    environment:
      GZIP: "<true|false>"
    volumes:
      - <myapp>-db:/usr/local/tomcat/webapps/ROOT/WEB-INF/db
      - <myapp>-dbdoc:/usr/local/tomcat/webapps/ROOT/WEB-INF/dbdoc
      - <myapp>-git:/usr/local/tomcat/webapps/ROOT/WEB-INF/git
volumes:
  <myapp>-db:
  <myapp>-dbdoc:
  <myapp>-git:
Note: set
GZIPtotrueif you don't have a reverse proxy in charge of compression.
Start the containers by:
sudo docker-compose up [-d]
Note: if you want to enable SSL you need to add items in the service's ports, environment and volumes sections:
services:
  web:
    image: registry.simplicite.io/platform:<tag>
    restart: always
    container_name: <myapp>
    ports:
      - 80:8080
      - 443:8444
    environment:
      GZIP: "<true|false>"
      SSL: "true"
      KEYSTORE_FILE: "/usr/local/tomcat/cert/myapp.jks"
      KEYSTORE_PASSWORD: "mypassword"
    volumes:
      - <myapp>-db:/usr/local/tomcat/webapps/ROOT/WEB-INF/db
      - <myapp>-dbdoc:/usr/local/tomcat/webapps/ROOT/WEB-INF/dbdoc
      - <myapp>-git:/usr/local/tomcat/webapps/ROOT/WEB-INF/git
      - /etc/ssl:/usr/local/tomcat/cert:ro
volumes:
  <myapp>-db:
  <myapp>-dbdoc:
  <myapp>-git:
In the above example the server certificate's keystore file as located as
/etc/ssl/myapp.jkson the host machine and its password ismypassword. See this document to learn how to build such a keystore file.
MySQL/MariaDB
Create the following docker-compose.yml file:
services:
  db:
    image: mysql:latest
    # or image: mariadb:latest (if you prefer MariaDB)
    restart: always
    container_name: <myapp>-database
    command: --default-authentication-plugin=mysql_native_password --character-set-server=utf8mb4 --collation-server=utf8mb4_unicode_ci
    environment:
      MYSQL_ROOT_PASSWORD: "simplicite"
      MYSQL_DATABASE: "simplicite"
      MYSQL_USER: "simplicite"
      MYSQL_PASSWORD: "simplicite"
    #Uncomment this if you want to access the database from the local host
    #ports:
    #- 127.0.0.1:3306:3306
    volumes:
    - <myapp>-db:/var/lib/mysql
  web:
    image: registry.simplicite.io/platform:<tag>
    restart: always
    container_name: <myapp>-webapp
    environment:
      GZIP: "<true|false>"
      DB_SETUP: "true"
      DB_VENDOR: "mysql"
      DB_HOST: db
      DB_USER: "simplicite"
      DB_PASSWORD: "simplicite"
      DB_NAME: "simplicite"
      DB_WAIT: 10
    ports:
     - 80:8080
    volumes:
    - <myapp>-git:/usr/local/tomcat/webapps/ROOT/WEB-INF/git
    depends_on:
    - db
volumes:
  <myapp>-db:
  <myapp>-git:
Start the containers by:
sudo docker-compose up [-d]
Note: if you want to enable SSL see above, set
GZIPtotrueif you don't have a reverse proxy in charge of compression.
PostgreSQL
Create the following docker-compose.yml file:
services:
  db:
    image: postgres:latest
    restart: always
    container_name: <myapp>-database
    environment:
      POSTGRES_USER: "simplicite"
      POSTGRES_PASSWORD: "simplicite"
      POSTGRES_DB: "simplicite"
    #Uncomment this if you want to access the database from the local host
    #ports:
    #- 127.0.0.1:5432:5432
    volumes:
    - <myapp>-db:/var/lib/postgresql/data
  web:
    image: registry.simplicite.io/platform:<tag>
    restart: always
    container_name: <myapp>-webapp
    environment:
      GZIP: "<true|false>"
      DB_SETUP: "true"
      DB_VENDOR: "postgresql"
      DB_HOST: db
      DB_USER: "simplicite"
      DB_PASSWORD: "simplicite"
      DB_NAME: "simplicite"
      DB_WAIT: 10
    ports:
     - 80:8080
    volumes:
    - <myapp>-git:/usr/local/tomcat/webapps/ROOT/WEB-INF/git
    depends_on:
    - db
volumes:
  <myapp>-db:
  <myapp>-git:
Start the containers by:
sudo docker-compose up [-d]
Note: if you want to enable SSL see above, set
GZIPtotrueif you don't have a reverse proxy in charge of compression.
Upgrade containers
The commands to upgrade containers managed by Docker Compose tool are:
sudo docker-compose pull
sudo docker-compose up [-d]
sudo docker image prune -a -f
Important:
Make sure to properly backup your data (database and documents fileststem if not using BOLOB mode) before upgrading the containers.
If, for any reason, you need to revert the upgrade you must restore the data in its previous state prior to restarting the old containers.
As a matter of fact any Simplicité platform upgrade is likely to alter the content and the structure of the core system.
Downgrading to a previous Simplicite container on an upgraded database may thus result in an undetermined state which may cause unpredicatable issues:
- Starting a previous minor (e.g; 5.0.x to 5.1.0) or major version (4.0 to 5.0.0) Simplicité container on an upgraded database will prevent the webapp to start (you will get a fatal error message indicating this explicitly).
- If the upgrade/downgrade is done from and to revisions of the same minor version (e.g. 5.0.3 to 5.0.4) the risks of blocking issues is very limited so the webapp will start but you may still experiment some unpredictable issues.
Note that you may also experiment issues when downgrading the database container but this is out of the scope of this document.
Backuping the data (database dump + document database filesystem archive if not using BLOB mode) is always the right thing to do before any container upgrade (Simplicité container and/or database container).
Run on a Kubernetes cluster
See this document.
Troubleshooting
Upgrade issues
If after an upgrade of Docker-ce on your host machine it refuses to start with the following message:
ERROR: ZONE_CONFLICT: 'docker0' already bound to a zone
Try this:
sudo firewall-cmd --zone=trusted --remove-interface=docker0
sudo firewall-cmd --zone=trusted --remove-interface=docker0 --permanent
Andd restart docker:
sudo systemctl start docker
DNS
If you experience network issues within your container it may be a DNS configuration issue
that you can solve by adding an explict DNS serveur IP address e.g. --dns=8.8.8.8 (public DNS by Google) or any private DNS relevant in your case.