Tomcat installation on Linux server
Warning: before choosing this "traditional" installation procedure you should consider other approches such as using Docker containers.
This document corresponds to a manual step-by-step installation on an out of the box Linux CentOS 7.
However the procedure should be rather similar with other modern Linux distributions of the RedHat family (RedHat ES, Fedora, ...). It should also be easily transposable to Debian flavored Linux distribution.
If you are looking for installation guideline for a Windows server installation, please refer to this document.
Prerequisites
As root or using sudo, install all required packages and do all required system configurations:
System encoding
Adjust LANG environment variable to appropriate value (e.g. en_US.UTF8 for UTF-8 or en_US for ISO-8859-1) in /etc/sysconfig/i18n.
Time zone for system date
Set appropriate timezone (change Europe/Paris to your timezone):
rm /etc/localtime ln -s /usr/share/zoneinfo/Europe/Paris /etc/localtime
Network time
Install the NTP daemon:
yum install ntp
Enable and start it:
systemctl enable ntpd.service systemctl start ntpd.service
Random entropy generator
Install a entropy generator (useful for all random-related stuff including SSL and Tomcat's sessions)
yum install epel-release yum install haveged
Enable it and start it:
systemctl enable haveged systemctl start haveged
OpenJDK
yum install java-latest-openjdk [java-latest-openjdk-devel]
Check (or change) the Java version used by the server:
alternatives --config java
Apache Ant
Install Ant from Apache website as distribution's version is quite old and has too many dependencies
wget http://www-eu.apache.org/dist/ant/binaries/apache-ant-1.10.1-bin.tar.gz sudo mv apache-ant-1.10.1 /opt/ tar xvfz apache-ant-1.10.1-bin.tar.gz sudo ln -s /opt/apache-ant-1.10.1 /opt/ant sudo sh -c 'echo ANT_HOME=/opt/ant >> /etc/environment' sudo ln -s /opt/ant/bin/ant /usr/bin/ant
Log out and log back in, to reload the environment variables defined in /etc/environment. Check ant version
ant -version
Databases
Install the package for the chosen database engine:
HSQLDB
Nothing to do (HSQLDB JAR is part of the application's libraries)
MariaDB (or MySQL)
Install the server and the JDBC driver:
yum install mariadb-server mysql-connector-java
Or on older distributions providing MySQL instead of MariaDB:
yum install mysql-server mysql-connector-java
Check and adjust if needed the maximum packet size, e.g. set max_allowed_packet = <n>M (where <n> is 16 or 32 or above) in /etc/my.cnf (in section [mysqld])
PostgreSQL
Install the server and the JDBC driver:
yum install postgresql-server postgresql-jdbc
Application account
Create a dedicated account:
useradd simplicite
Connect this account:
su - simplicite
Tomcat
Clone the preconfigured Tomcat package (which is just an out of the box Tomcat package with administration webapps removed, with some settings fine-tuned and with some additional jars in the lib folder) with appropriate credentials:
git clone https://<username>[:<password>]@platform.git.simplicite.io/tomcat.git
Make sure the tomcat/temp folder is present and writeable, this is mandatory for images thumbnails generation.
Then, make sure the tomcat/logs folder is present and writeable, this is mandatory for logging.
Add aliases in the simplicite user's .bashrc or in a global /etc/profile.d/simplicite.sh :
alias vi=vim
alias rm='rm -i'
alias cp='cp -i'
alias mv='mv -i'
alias dir='ls -alF'
alias tomcat='sudo /etc/init.d/tomcat'
export TOMCAT_ROOT=$HOME/tomcat
alias tt="tail -100f $TOMCAT_ROOT/logs/catalina.out"
alias ts="tail -100f $TOMCAT_ROOT/webapps/ROOT/WEB-INF/log/simplicite.log"
export ANT_OPTS="$ANT_OPTS -Dtomcat.root=$TOMCAT_ROOT -Dtomcat.host=localhost -Dtomcat.httpport=8080 -Dtomcat.httpsport=8443 -Dtomcat.sslport=8444 -Dtomcat.ajpport=8009 -Dtomcat.adminport=8005 -Dservice.url=http://localhost:8080/io"
Others
Optionally, you can add extra useful packages (back as root):
yum install vim git wget lynx nmap ...
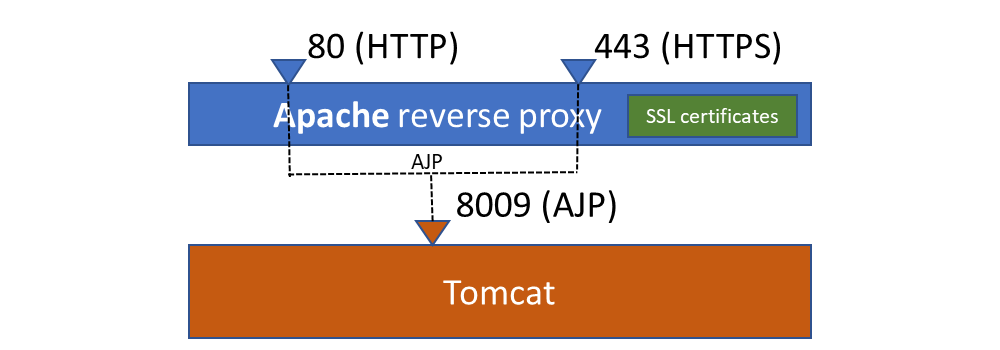
Option 1 - Expose Tomcat using an Apache AJP reverse proxy
As root, install apache with SSL module :
yum install httpd mod_ssl
Add this to /etc/httpd/conf/httpd.conf for an HTTP endpoint:
ProxyPass /[<myapp>/] ajp://localhost:8009/[<myapp>/] [secret=<AJP secret if applicable>]
Where <myapp> is the actual deployment context path of your webapp if your it is not deployed as root webapp.
You can also add the same directive for an HTTPS endpoint.
This corresponds to the following configuration:
Enable and start Apache:
systemctl enable httpd.service systemctl start httpd.service
Note: if you get HTTP
503error on this page you can try running the following command asroot:chcon -Rt httpd_sys_content_t /var/www
Create /etc/init.d/tomcat script with following content:
#!/bin/sh
#
# Tomcat Control Script
#
# chkconfig: 2345 85 25
#
# description:  Start up the tomcat engine.

# Source function library.
. /etc/init.d/functions

RETVAL=$?

JAVA_OPTS="-Xms512m -Xmx1024m -Dplatform.autoupgrade=true"
export JAVA_OPTS
TOMCAT_HOME="/home/simplicite/tomcat"
TOMCAT_USER="simplicite"

case "$1" in
start)
	echo $"Starting tomcat engine"
	cd $TOMCAT_HOME/bin
	/bin/su $TOMCAT_USER startup.sh
	;;
stop)
	echo $"Stopping tomcat engine"
	cd $TOMCAT_HOME/bin
	/bin/su $TOMCAT_USER shutdown.sh
	;;
*)
	echo $"Usage: $0 {start|stop}"
	exit 1
	;;
esac

exit $RETVAL
Adjust JAVA_OPTS to suitable settings for your environment.
Make this script executable:
chmod +x /etc/init.d/tomcat
Enable and start Tomcat:
chkconfig tomcat on /etc/init.d/tomcat start
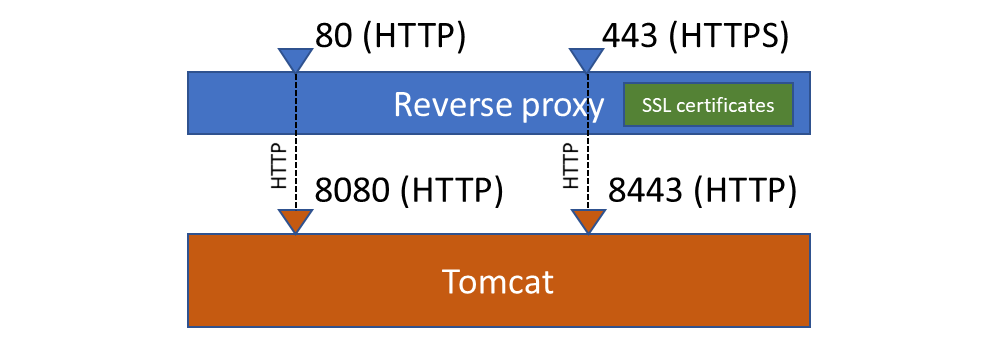
Option 2 - Expose Tomcat using a NGINX HTTP reverse proxy
As root, install NGINX :
yum install epel-release yum install nginx
Note: check this page for details on NGINX installation
Add a new tomcat.conf configuration file in /etc/nginx/conf.d with following content:
server {
    listen 80;
    server_name <server name>;
    access_log /var/log/nginx/<server name>.log main;
    location /[<myapp>] {
        # Uncomment this block if you need to enable CORS
        #if ($request_method = 'OPTIONS') {
        #    add_header Access-Control-Allow-Origin $http_origin;
        #    add_header Access-Control-Allow-Credentials true;
        #    add_header Access-Control-Allow-Headers Content-Type,Authorization,X-Requested-With,X-HTTP-Method-Override,X-Simplicite-Authorization;
        #    add_header Access-Control-Allow-Methods GET,POST,PUT,DELETE,HEAD,OPTIONS;
        #    add_header Access-Control-Max-Age 1728000;
        #    add_header Content-Type text/plain;
        #    add_header Content-Length 0;
        #    return 204;
        #}
        if ($request_method ~ '(GET|POST)') {
        #    Uncomment these 3 lines if you need to enable CORS
        #    add_header Access-Control-Allow-Origin $http_origin always;
        #    add_header Access-Control-Allow-Credentials true always;
        #    Uncomment these 3 lines if you need to enable CSP and other security directives (make sure to add specific directives for external services your application may use e.g. Google Maps, ..)
        #    add_header Content-Security-Policy "default-src 'self'; img-src 'self' data:; script-src 'self' 'unsafe-inline' 'unsafe-eval' blob:; style-src 'self' 'unsafe-inline'; font-src 'self' data:" always;
        #    add_header X-Frame-Options SAMEORIGIN always;
        #    add_header X-XSS-Protection "1; mode=block" always;
        }
        proxy_redirect off;
        proxy_buffering off;
        proxy_read_timeout 86400s;
        proxy_send_timeout 86400s;
        proxy_set_header Host $http_host;
        proxy_set_header X-Real-IP $remote_addr;
        proxy_set_header X-Forwarded-For $proxy_add_x_forwarded_for;
        proxy_set_header X-Forwarded-Proto https;
        proxy_redirect off;
        proxy_pass http://localhost:8080[/<myapp>];
        proxy_http_version 1.1;
        proxy_set_header Upgrade $http_upgrade;
        proxy_set_header Connection "upgrade";
    }
    #
}
Where <myapp> is the actual deployment context path of your webapp if your it is not deployed as root webapp.
You can duplicate the above block to expose also an HTTPS endpoint on port 443 with additional appropriate SSL certificates directives.
This corresponds to the following configuration:
Note that a default robots.txt file is deployed at the root of the web application to prevent any indexation from regular indexation robots.
This avoids useless public sessions to be created by these robots. But sometimes you may also need to handle your web monitoring tool(s) requests
for the same reason. To do so you need to find a way to recognize your web monitoring tool(s) requests (usually from its user agent string
or from its origin IP, etc.) and redirect all traffic to the /health health-check page.
E.g. for a monitoring tool whose user agent starts with MyMonitorTool you can add this to your NGINX configuration (before the location /<webapp> bloc):
    if ($request_uri != "/health") {
        set $monitor A;
    }
    if ($http_user_agent ~* "^NodeUptime.*$") {
        set $monitor "${monitor}B";
    }
    if ($monitor = AB) {
        rewrite ^/.*$ /health permanent;
    }
Change/add these configuration items in the main NGINX configuration file as root:
vi /etc/nginx/nginx.conf
http {
(...)
	client_max_body_size 100M;
	gzip on;
	gzip_types text/plain text/css text/javascript text/xml application/json application/javascript application/x-javascript;
	server_names_hash_bucket_size 128;
(...)
}
Enable and start NGINX:
systemctl enable nginx.service systemctl start nginx.service
The rest is the same as above for Apache.
Note: SELinux may be causing HTTP
502errors, check this post for a solution that works. A quick solution being to run the following command asroot:setsebool httpd_can_network_connect 1 -P
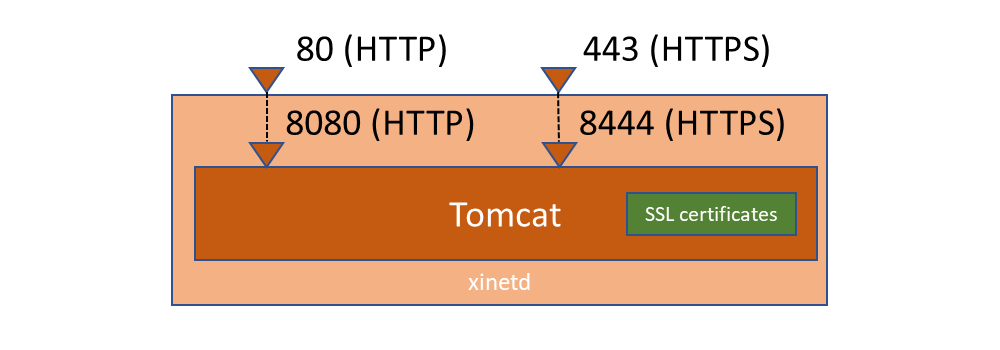
Option 3 - Expose Tomcat using the xinetd daemon
The xinetd daemon allows to expose Tomcat HTTP (8080) and HTTPS (8444) ports as default HTTP (80) and HTTPS (443) ports.
In this case Apache and/or NGINX must be inhibited.
As root, install xinetd :
yum istall xinetd
Create /etc/xinetd.d/tomcat-http as follows:
service http
{
	disable = no
	socket_type = stream
	user = root
	wait = no
	redirect = 127.0.0.1 8080
}
Create /etc/xinetd.d/tomcat-https as follows:
service https
{
	disable = no
	socket_type = stream
	user = root
	wait = no
	redirect = 127.0.0.1 8444
}
This corresponds to the following configuration:
Enable and start xinetd:
systemctl enable xinetd systemctl start xinted
The /etc/init.d/tomcat script (and associated commands) is the same as when using above Apache reverse proxy option.
Option 4 - Expose Tomcat using the jsvc daemon
Tomcat provides a tool (that needs to be compiled) to allow it to use default HTTP (80) and HTTPS (443) ports.
In this case Apache and/or NGINX must be inhibited.
As root, install the gcc compiler:
yum install gcc make
Compile jsvc:
cd tomcat/bin tar xvfz commons-daemon-native.tar.gz cd commons-daemon-x.y.z-native-src/unix ./configure --with-java=/usr/lib/jvm/java gmake mv jsvc ../..
Add this to tomcat/bin/daemon.sh if not present in the options section:
	--catalina-out )
		CATALINA_OUT="$2"
		shift; shift;
		continue
	;;
Change ports in tomcat/conf/server.xml: 8080to 80 and 8444 to 443.
This corresponds to the following configuration:

Create /etc/init.d/tomcat script with following content:
#!/bin/sh
#
# Tomcat for Control Script
#
# chkconfig: 2345 85 25
#
# description:  Start up the Tomcat engine.

# Source function library.
. /etc/init.d/functions

RETVAL=$?

JAVA_OPTS="-Xms512m -Xmx1024m -Dplatform.autoupgrade=true"
export JAVA_OPTS
TOMCAT_HOME="/home/simplicite/tomcat"
TOMCAT_USER="simplicite"
TOMCAT_JVM="/usr/lib/jvm/java"
TOMCAT_LOG="/var/log/tomcat.log"
TOMCAT_PID="/var/run/tomcat.pid"
OPTS="--java-home $TOMCAT_JVM --tomcat-user $TOMCAT_USER --catalina-out $TOMCAT_LOG --catalina-pid $TOMCAT_PID"

case "$1" in
start)
	echo $"Starting tomcat engine"
	cd $TOMCAT_HOME/bin
	./daemon.sh $OPTS start
	;;
stop)
	echo $"Stopping tomcat engine"
	cd $TOMCAT_HOME/bin
	./daemon.sh $OPTS stop
	;;
*)
	echo $"Usage: $0 {start|stop}"
	exit 1
	;;
esac

exit $RETVAL
Adjust JAVA_OPTS to suitable settings for your environment.
Make this script executable:
chmod +x /etc/init.d/tomcat
Enable and start Tomcat:
chkconfig tomcat on /etc/init.d/tomcat start
Notes
Max upload size
By default the maximum file upload allowed (from a POST request by Tomcat is of 2Mb. In most cases you need to increase this to match
the value of the MAX_UPLOAD_SIZE system parameter (which defaults to 100Mb). To do so you need to set the maxPostSize of the Tomcat Connector accordingly.
If you are using NGINX as reverse proxy you must also add client_max_body_size 100M to the /etc/nginx/nginx.conf file.
GZip compression
By default, the GZip compression is not activated on Tomcat HTTP(S) connector(s). You can activate it by adding compression="on" compressableMimeType="text/html,text/plain,text/xml,text/json,text/css,text/javascript,application/javascript,application/json" to your connector(s).
Add this only on HTTP(S) connector(s), not on the AJP connector.
Don't add this if your connectors are accessed by a web server configured as a reverse proxy, in this case the GZip compression must be configured at the web server (Apache or NGINX) level.
For Apache acting as AJP reverse proxy add this to /etc/httpd/conf/httpd.conf to enable compression:
(...)
DeflateCompressionLevel 9
AddOutputFilterByType DEFLATE text/html
AddOutputFilterByType DEFLATE text/plain
AddOutputFilterByType DEFLATE text/css
AddOutputFilterByType DEFLATE text/javascript
AddOutputFilterByType DEFLATE text/xml
AddOutputFilterByType DEFLATE application/json
AddOutputFilterByType DEFLATE application/javascript
AddOutputFilterByType DEFLATE application/x-javascript
(...)
For NGINX acting as HTTP reverse proxy the compression configuration is described above.