Simplicité with Portainer & Traefik
Portainer is a professional Docker cluster management tool that facilitates installation and operation of Docker containers. This lesson leverages its power to rapidly install Simplicité instances on a server, with the following objectives:
- minimal manual configuration
- SSL certificates auto-setup with Let's Encrypt
- HTTP -> HTTPS redirection
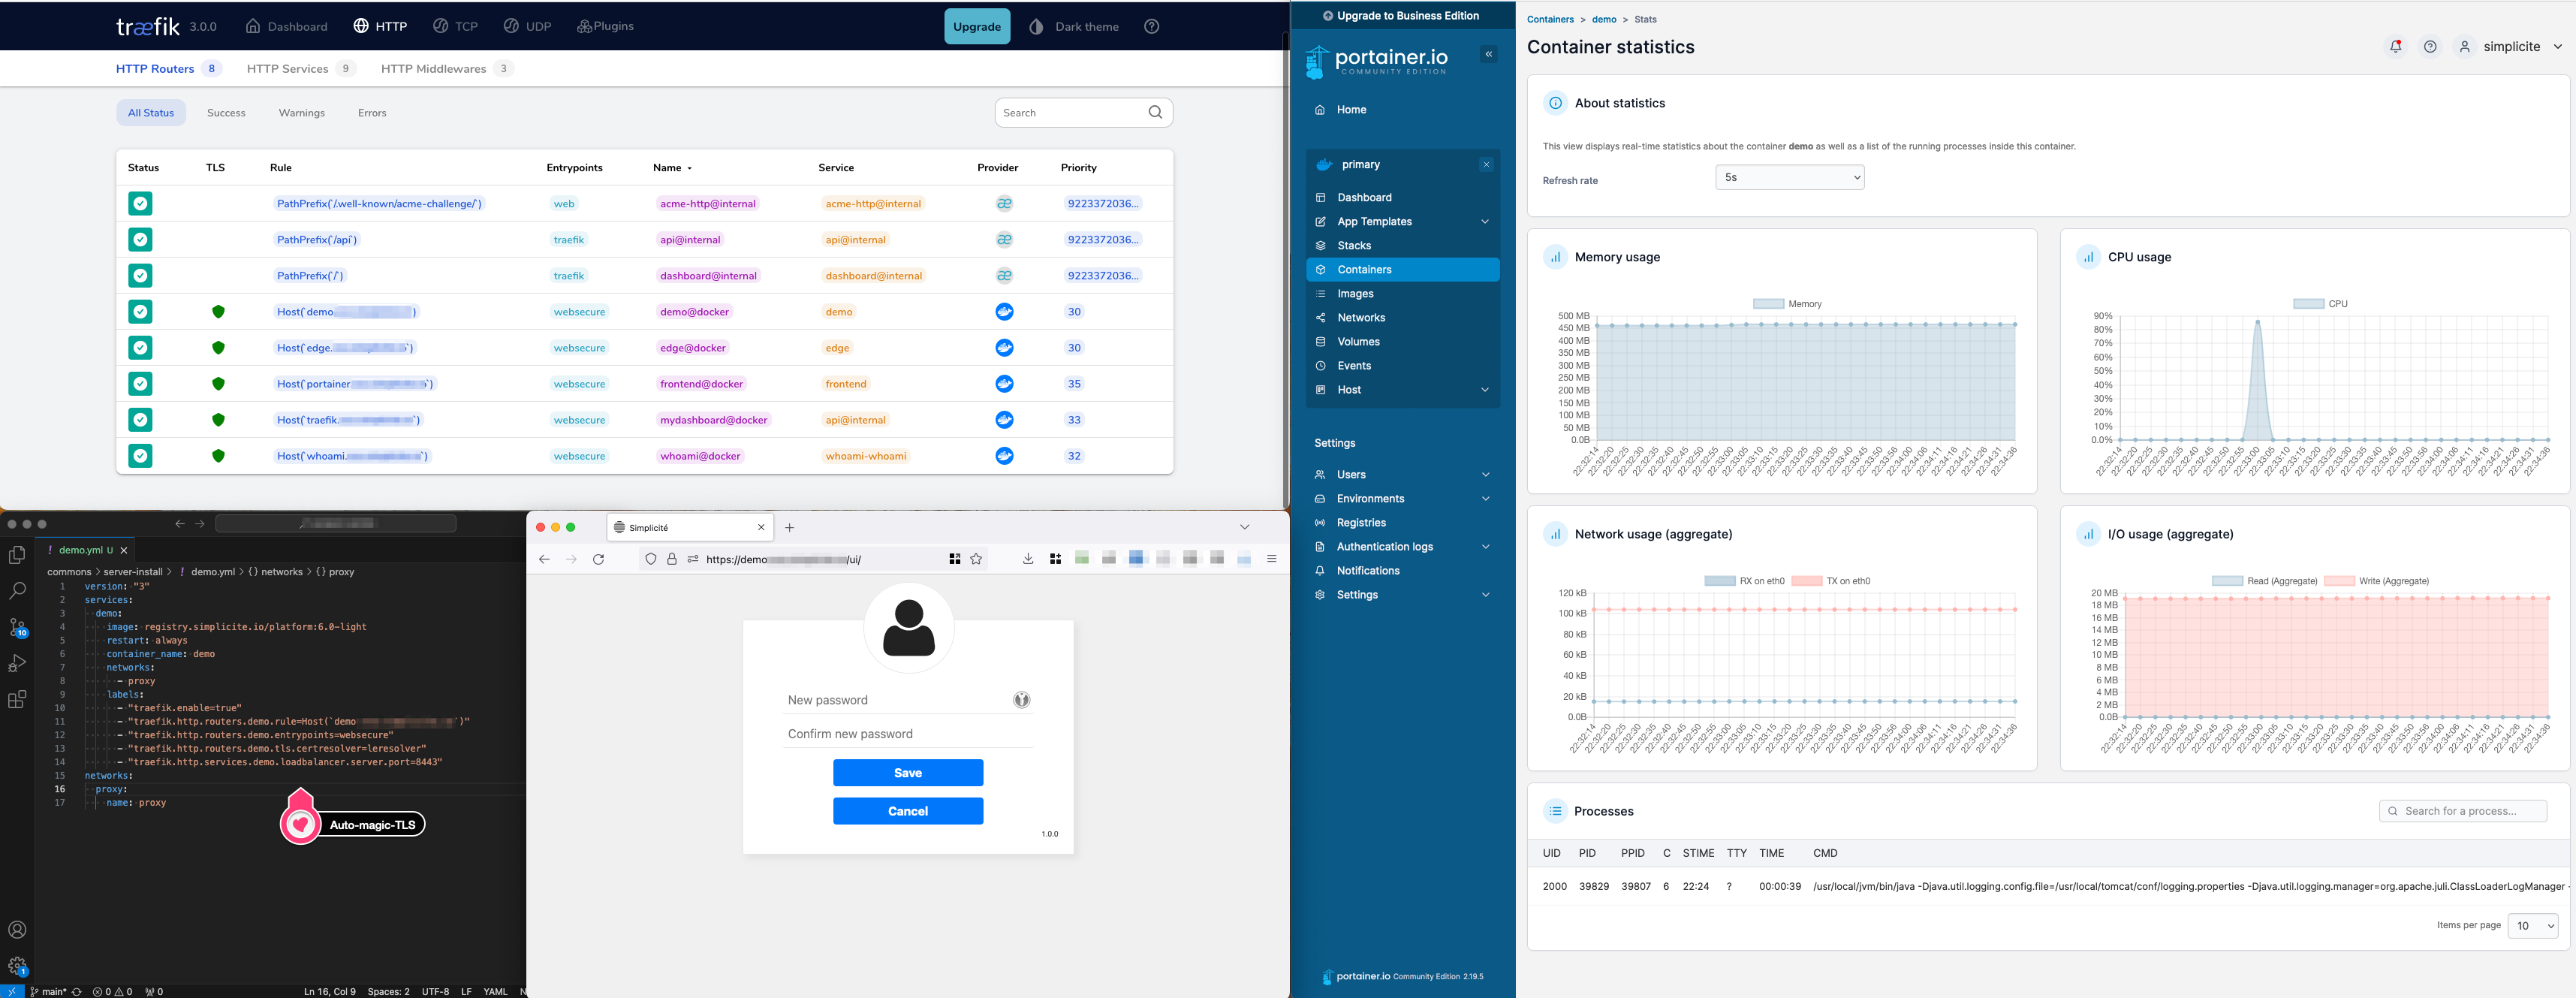
- Traefik's reverse proxy dashboard activated and available at
traefik.my.domainbehindadmin / _ChangeItNow_default basic auth (can be changed usinghtpasswd -bn your_user_name your_super_complex_password | sed 's/\$/$$/g', doubling the$is required) - Portainer available at
portainer.my.domain - allow remote debugging
1) Server deployement
Sizing of the server should be made acording to the needs, as always. Any up-to-date unix image should be able to run the containers.
Click to open
- in this example, we chose a medium-sized server
- 2 vCores
- 50GiB storage
- 250Mbps bandwidth
- for the image, we chose almalinux 9
2) Docker Install
Portainer needs docker as a requirement, so we'll install it after usual upgrades. Based on docker CentOS install docs (adapted)
sudo timedatectl set-timezone Europe/Paris
sudo dnf update -y
sudo dnf config-manager --add-repo=https://download.docker.com/linux/centos/docker-ce.repo
sudo dnf install docker-ce docker-ce-cli containerd.io docker-buildx-plugin docker-compose-plugin
sudo systemctl start docker
sudo systemctl enable docker
sudo docker run hello-world # check everything is running smoothly
Portainer also needs SELinux disabled
sudo sed -i 's/SELINUX=enforcing/SELINUX=disabled/g' /etc/selinux/config
sudo reboot
Note: Optionaly a firewall should be configuerd on the host (or among the host) to allow only the relevant traffic.
Minimal configuration is to allow the HTTP port 80 and HTTPS port 443 (along with the SSH port 22 from legitimate origins) through this firewall.
3) Portainer install with lets encrypt and traefik
This is a modified version of the config given in Portainer's doc "Deploying Portainer behind Traefik Proxy"
This config has to be copied at the home of your user and started with sudo docker compose up -d, after which you should be able to access traefik.my.domain and portainer.my.domain.
See config
Important: you must create a local
acme.jsonwith600rights prior to starting this Docker compose configuration.
services:
  traefik:
    container_name: traefik
    image: "traefik:latest"
    ports:
      - "80:80"
      - "443:443"
    networks:
      - proxy
    volumes:
      - "/var/run/docker.sock:/var/run/docker.sock:ro"
      - "./acme.json:/acme.json"
    command:
      - --api.insecure=true
      - --api.dashboard=true # to activate Traefik dashboard
      - --entrypoints.web.address=:80
      - --entrypoints.web.http.redirections.entrypoint.to=websecure
      - --entryPoints.web.http.redirections.entrypoint.scheme=https
      - --entrypoints.websecure.address=:443
      - --entrypoints.websecure.asdefault=true
      - --log.level=INFO
      - --accesslog=true
      - --providers.docker
      - --providers.docker.network=proxy
      - --providers.docker.exposedByDefault=false
      - --certificatesresolvers.leresolver.acme.httpchallenge=true
      - --certificatesresolvers.leresolver.acme.email=mail@my.domain #email for the generation of SSL certificates with Let's Encrypt.
      - --certificatesresolvers.leresolver.acme.storage=./acme.json
      - --certificatesresolvers.leresolver.acme.httpchallenge.entrypoint=web
    labels:
      - traefik.enable=true
      - traefik.http.routers.mydashboard.rule=Host(`traefik.my.domain`) # adapt domain
      - traefik.http.routers.mydashboard.tls.certresolver=leresolver
      - traefik.http.routers.mydashboard.entrypoints=websecure
      - traefik.http.routers.mydashboard.service=api@internal
      - traefik.http.routers.mydashboard.middlewares=myauth
      - traefik.http.middlewares.myauth.basicauth.users=admin:$$apr1$$HQ4CZZxC$$kUrQ6qAFrX4v/EAYFdrsh1 # adapt basic auth
  portainer:
    image: portainer/portainer-ce:latest
    command: -H unix:///var/run/docker.sock
    restart: always
    networks:
      - proxy
    volumes:
      - /var/run/docker.sock:/var/run/docker.sock
      - portainer_data:/data
    labels:
      # Frontend
      - "traefik.enable=true"
      - "traefik.http.routers.frontend.rule=Host(`portainer.my.domain`)" # adapt domain
      - "traefik.http.routers.frontend.entrypoints=websecure"
      - "traefik.http.services.frontend.loadbalancer.server.port=9000"
      - "traefik.http.routers.frontend.service=frontend"
      - "traefik.http.routers.frontend.tls.certresolver=leresolver"
      # Edge
      - "traefik.http.routers.edge.rule=Host(`edge.my.domain`)" # adapt domain
      - "traefik.http.routers.edge.entrypoints=websecure"
      - "traefik.http.services.edge.loadbalancer.server.port=8000"
      - "traefik.http.routers.edge.service=edge"
      - "traefik.http.routers.edge.tls.certresolver=leresolver"
networks:
  proxy:
    name: proxy
volumes:
  portainer_data:
The Traefik container and the Simplicité instances have to run in the same docker network, that's why we create a "proxy" network where we'll put all our containers.
4) Configure
- access
https://portainer.my.domainright after starting the service (it's only configurable for a limited amout of time) - create local environement
- create registry.simplicite.io registry, with authentication
- pull a Simplicité image
5) Start a Simplicité instance
This is the minimal configuration to get a working Simplicité (non persistent) instance. Create a "stack" (a docker compose deployement, in Portainer's semantics), and paste the following config.
services:
  test:
    image: registry.simplicite.io/platform:6-latest-light
    restart: unless-stopped
    container_name: test
    networks:
      - proxy
    labels:
      - "traefik.enable=true"
      - "traefik.http.routers.test.rule=Host(`test.my.domain`)"
      - "traefik.http.routers.test.entrypoints=websecure"
      - "traefik.http.routers.test.tls.certresolver=leresolver"
      - "traefik.http.services.test.loadbalancer.server.port=8443"
networks:
  proxy:
    name: proxy
To make it persistent add the following volumes to the above configuration:
services:
  test:
    (...)
    volumes:
      - db:/usr/local/tomcat/webapps/ROOT/WEB-INF/db
      - dbdoc:/usr/local/tomcat/webapps/ROOT/WEB-INF/dbdoc
      - git:/usr/local/tomcat/webapps/ROOT/WEB-INF/git
(...)
volumes:
  db:
  dbdoc:
  git:
To enable JPDA remote debugging add the following environment variables and open an access to port 8000. Assign a different port to each instance (8001, 8002, 8003...).
services:
  test:
    (...)
    ports:
      - 8001:8000 # expose port 8000
    environment:
      (...)
      JPDA: "true"
      JPDA_SUSPEND: "<y|n, defaults to n>" # true to wait for debugger
    (...)
6) Configure stack templates
You can also configure Portainer to use our stack templates, to do so change the App Templates URL in the settings using this URL: https://cdn.jsdelivr.net/gh/simplicitesoftware/resources@latest/public/portainer_templates/templates.json

Or manually configure custom templates using the *.yml present at this location.
Backup an instance
This script makes the assumption that you have deployed with portainer a stack that with an app service (Simplicité) and a database service (PostgreSQL). You can call it daily and setup rotating backups.
Click to see backup script example
# stop stack
BACKUPDIR=$(date +"backup-%Y-%m-%d-%H%M")
COMPOSE_PROJECT="XXXX" # the name of the stack

APP_SERVICE="XXXX" # name of the service (not the container)
APP_DBDOC_VOLUME="XXXX" # name of the volume (careful, docker compose prefixes it with the stack name)

PSQL_SERVICE=""
PSQL_DBNAME="simplicite"
PSQL_DBUSER="simplicite"

mkdir $BACKUPDIR

# stop Simplicité service
sudo docker compose -p $COMPOSE_PROJECT stop $APP_SERVICE

# save database dump
sudo docker compose -p $COMPOSE_PROJECT exec $PSQL_SERVICE sh -c "rm -f /var/lib/backup/database.dump"
sudo docker compose -p $COMPOSE_PROJECT exec $PSQL_SERVICE sh -c "pg_dump -U $PSQL_DBUSER $PSQL_DBNAME > /var/lib/backup/database.dump"
sudo docker compose -p $COMPOSE_PROJECT cp $PSQL_SERVICE:/var/lib/backup/database.dump $BACKUPDIR/database.dump

# save dbdoc
sudo docker run -v $APP_DBDOC_VOLUME:/data --name helper busybox true
sudo docker cp helper:/data $BACKUPDIR/dbdoc
sudo docker rm helper

# restart Simplicité service
sudo docker compose -p $COMPOSE_PROJECT start $APP_SERVICE

# create archive & clean
tar -czvf $BACKUPDIR.tgz $BACKUPDIR
rm -rf $BACKUPDIR